


Is there anything more satisfying than organising your dressing table and beauty supplies?
It’s one of those things you rarely get a chance to do but when you do it’s pure magic… Although if I’m honest my dresser is usually a complete shambles! One thing that helps me stay organised once I’ve put the time into decluttering and cleaning, is nice storage solutions. So today we’re sharing with you a little DIY idea – how to make a storage box for your dresser out of a (crappy!) cardboard box and some rope. Paired on your dresser with a marble tray, a gold candle holder and all your favourite things and you’ve got a perfect little nook that you won’t dare mess up… Right?

DIY Woven Rope Box


3
Using a wide tip marker pen is particularly useful, since you'll need to cut small gaps instead of just cutting the sides into strips.


5
Start by decorating the inner base of the box. We did an inwards spiralling pattern. Just dab a bit of hot glue as you go along, pressing the string into the glue.


7
Then we're going to start weaving around the sides of the box. Dab a bit of glue at the starting point, then begin looping the string in and out of the box, weaving between the panels.

8
You will need to alternate the following layers after doing a full loop and you arrive back at the starting point. One layer will go over outside of the corner, and the following will have to go over the inside of the corner, then repeat. That way, you'll be able to alternate the pattern of the weave. Note there will be lots of gaps to start with but once you start pushing your rope down they will go away.

9
Keep weaving and close off the weave with another dab of hot glue. I purposely hid the string in the inside of the box.

10
We finished the top by looping the string around the edges instead of weaving them. And voila!

Voila!

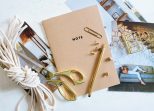
On my dresser:
Artwork by Jazzdiprima and Belinda Xia, marble tray from a vintage store (like this one), glass jewelry box, H&M candle holder, John Masters hydrating mist and vitamin C serum, vintage ring holder, trinket dish from H&M, rose gold Cluse watch.

Pin this easy DIY on Pinterest!


I never would have thought that this beautiful box is a DIY!
xx from Bavaria/Germany, Rena
http://www.dressedwithsoul.com
Wow, that’s great, I would never thought that one can make such a nice and functional thing so easily. With minimum materials that almost every of us have at home, it is possible to get such a stylish box to bring everything to order on the dressing table. Will definitely try to make the same myself! Great post!
http://familyhearth.epizy.com
I never thought you could do something like this with a simple cardboard box! How cool!
https://www.makeandmess.com/
That box is so cute. It turned out so pretty.
https://sugarcoatedbears.blogspot.com/
I absolutely love this idea! I am going to keep it in mind. X
http://www.thoughtsinstyle.com/
The box is pretty, but it’s the watercolour of the dog in the hat that really caught my eye. Where’s it from?
This box is sooo cute! 🙂 And thank you so much for sharing this simple yet super fun DIY! I really want to make one of these for my vanity! <3
XO, Elizabeth
http://clothestoyouuu.com/
Oh wow! Superb idea and great tutorial, This box look so amazing. I want try to make this type of box. Thanks for sharing with us.
Inlay work
https://www.akbarinternational.com/
This is positively the cutest little woven box I have ever seen x
Maddison Jayne | maddisonjayne.blog/