


")
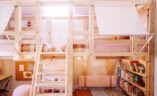
My excitement levels are at about 3 million percent when I talk about the wardrobes we put into our renovation!
I’ve mentioned this before, but one of the things that we really wanted to do with Best End House was to create lots of little, simple design solutions that didn’t cost a bomb but had a lot of functional and aesthetic value. Enter, these mid-century inspired wardrobes, that we put into each room of the house and that are made out of… kitchen pantry cabinets! Lots of you have been asking me when I would share the tutorial for these, and I’m sorry for the delay. I had wanted to wait until we had posted the Master Bedroom reveal before I showed you the full post of these. So without further delay, here’s how we did it!
-23")
Materials we used
- Kaboodle pantry cabinet bases (3 pantry cabinet units per wardrobe)
- Kaboodle door in a ‘modern’ profile (6 doors per wardrobe as each unit uses 2 doors)
- Wardrobe accessories including 3 clothing rails, 2 sets of basket drawers and 3 shelves (all from Bunnings).
- 10 inch (25 cm) Mid century legs in walnut (8 per wardrobe)
- Bowl doorknobs (6 per wardrobe)
- Clear gloss paint
How We Did It
- Designed the layout The first thing we did for these wardrobes was to work out the best placement and layout in the rooms. We wanted wardrobes in each room because more is more when it comes to storage! In the master bedroom that meant designing the ‘hall-drobe’ (the walk in wardrobe in the hall) so that the cupboards fitted perfectly and the wardrobes were flush with the walls. In the other rooms, that mean choosing the best wall to locate the cupboards. For the other bedrooms we decided to leave a gap to one side, for plants, a hat rack or perhaps eventually a small built in desk.
- Installed The Kitchen Cupboards The cupboard units (the white units inside the wardrobe) actually get attached to the walls first, making them safe and secure (essential with kids!).
- Added the doors. The next step is to add on the unpainted doors to the front of the cabinet units.
- Added the legs Time to add the legs! You do this using the mounting plates that are provided with the legs. The legs provide additional support and also the design aesthetic we were looking for.
- Painted the cupboards So we originally chose the ‘paint your own’ doors so that we could paint these any colour we wanted, but when they arrived we actually liked the tone of the wooden doors, and decided they would look great with a simple coat of clear gloss paint. We used a brush (rather than a roller or spray) to give them a more vintage feel.
- Added the doorknobs. The bowl doorknobs we chose for these tied into the mid century aesthetic we wanted, and are also really comfortable to use. Win!
- Inserted the wardrobe accessories. Finally, it was time to kit out the inside. Because the cabinets are meant to be for a pantry, they needed a few tweaks to make them work for a wardrobe. We configured them all a bit differently, one with just a rail and a shelf (as shown) for hanging longer items, and then the rest with a rail above and then 3 basket drawers below.
-
Laying out the space. - Laying out the space.
-1")
-
Getting the dimensions right. - Getting the dimensions right.
-3")
-
The pantry cabinets. - The pantry cabinets.
-6")
-
Ben checking the hall-drobe. - Ben checking the hall-drobe.
-4")
-
Simple doors, before we put the seal on, - Simple doors, before we put the seal on,
-8")
- Swapped out basic handles
")
-14")
-12")
Voila!
-15")

Once again I have to admit this was Ben’s idea and it worked so well, and came it much cheaper than custom wardrobes, and much more chic that off the rack options.
-19")
-17")
-21")

-20")
-25")
-29")
-22")
-28")
-24")
-26")
Let me know your thoughts!


