


")
Would you paint wooden furniture?
It’s a tough question, and I know it’s one that people feel strongly about. Some people say that it’s such a shame to cover up wooden surfaces, but to that I say: you only live once! I mean, yes if you have a very expensive piece of furniture it would probably be best not to cover it in paint, but instead try it out on inexpensive pieces that, ideally, aren’t in the best shape and would be improved with a coat of paint. It’s something we’ve done a lot of in our renovation!
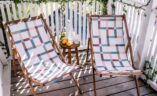
Personally, I think it’s great because it allows you to inject personality into a space, without going the whole hog and painting a wall or choosing coloured tiles. Flat painted furniture was something we saw in a hotel in Ibiza a few years ago and loved it. So, for our own space we bought some antique pieces and painted them to get *just* the right finish and mix of colours. It allowed us to embrace a colourful palette without going overboard.

A lot of you asked me how and what we used to paint out furniture, so I thought would be useful to share with you a step by step guide. Because even though it might look easy tp what some paint on a cabinet, there are a few things you should do in order for it to look professional.

You need
- Paint brushes. Use smaller ones for chairs and other items will lots of crevices, and bigger ones and rollers for tables and other large items.
- Primer paint. I use light primer most of the time.
- Sand paper. Some large grain for the first sand and smaller grain when doing the final smooth.
- Paint. Exterior, oil based paints can sometimes work well for furniture that will get a lot of wear, otherwise a simple wall paint will work.
Step 1
To avoid any unwanted paint marks in your working space, place your furniture out on some tarp or a painters sheet. It also always helps to have some sheet around when you are painting to remove any marks.
Step 2
Prepping is an important part of the process in order to ensure a nice, even finish that lasts. Putting a bit of effort into the preparation is actually as essential as painting. Begin by wiping down any dust on the surface. You might want to give it a wash if it’s particularly dirty.
Step 3
Next, it’s a good idea to sand your furniture, particularly if it has a clear layer of paint over the wood. If this is the case, you should try to sand all the surfaces to remove as much of this as possible.
Step 4
Following the direction of the grain, apply a white primer. This is even more important if the colour you are painting the piece of furniture is lighter than your base. Allow the primer to dry, ideally overnight for a better end result.
Step 5
Once the primer has dried, it’s a good idea to give it another rub down with some light grain sandpaper so that the surface is smooth. Then, apply the first coat of paint and allow it to dry fully between each coat. Two or three coats may be necessary for an even finish.
Step 6 (Optional)
If required, you can apply a layer of gloss paint as a protective layer. We wanted ours to have a more chic matte finish so we skipped this step but its useful to consider how the furniture will be used and whether it needs an extra protective layer.


