


Ready to get stumpy?!
Even though all DIY projects are a labour of love, some are more than others. And when it comes to these stump stools, well there’s a truckload of labour and a mountain of love… I fell for stump stools agggesss ago when I spied at every cool furniture brand around – it seemed everywhere (aka every Pinterest board) I looked at had a little stump stool or side table just chilling in the corner. I had to have one! But on closer inspection I was always a little blown away by the price, sometimes running a thousand or more dollars, with a little voice inside my head going ‘But isn’t that just a bit of tree stump?!’. And yes, they are indeed a bit of tree stump, but after creating a few of our own it’s clear that they’re a little more complicated to craft yourself than I first thought. Either way I wanted to share this project with you, because it turned out so perfect. If you’ve got a bit of time, some elbow grease and a fallen tree, you should definitely make a few yourself!

Decor items: DIY stump stool, Linen bedding from Cultiver, Dusty Pink Throw, Rust cushions and gold tea light candle holder from H&M Home, travel candle from Lumira, DIY headboard, DIY Mud cloth cushion.
The Before
First, you’ll need to get your hands on a stump. There are lots of options for this, like a lumber yard, but a big storm in our neighbourhood saw lots of fallen trees, something that’s always very sad, but (after the appropriate mourning period) my mind went to how I could work my DIY magic on the leftover stumps. Ben was promptly enlisted to help in the retrieval, and luckily he’s a man who likes a task, because with minimal complaint we hauled them into the studio. Note: it was backbreaking because they weigh about 25kg each, so don’t expect to move them a lot once they’re done!


How to make these DIY stump stools
To create these we researched a lot of different methods, from the least work to the most, and found that in order for them to look as smooth and beautiful as all the ones I had been coveting online, we weren’t going to be able to cut any corners. My first thought was to simply paint the outside with white paint… In fact, we tried that with one and it looks pretty bad, but that’s an option if you want to do it the simple/lazy way! The steps we’re sharing with you below is for a style that is A+ but feel free to experiment!
What You'll Need

1
The first step is to remove the bark from the outside of the stump. Depending on what type of tree it is, you might be able to peel it off. Because ours was a bit more stubborn, we used an axe and hammer to chip away the surrounding bark.

2
The next step is to sand the outside of the stump. We used a rotary sander for this step. We looked into using ordinary sandpaper, but we worked out it would take wayyyyy too long to do it this way. Sadly! But we bought a sander for about $45 and it was able to give a really smooth finish. It's the only way to go!

3
Very important thing to note: When using a rotary sander, wear a pair of safety goggles and a respirator mask. You don't want to be breathing in the fine sawdust from the sanding process, or have a piece of wood fly into your face! A pair of non-slip working gloves is also always handy.

4
This step is optional, but if you're going to be placing your stool outdoors, it's a good idea to cover the stump with some wood glaze, to prevent moisture from seeping into the stool.


6
For one of our stools we painted it completely white, using normal acrylic paint.Two layers were enough to fully cover the stool.

7
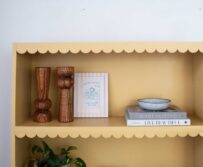
For the unglazed, sanded stool, we decorated it with some custom scallop patterns. We printed out the pattern and cut using a utility knife, position and stick it onto the stool with masking tape, then fill in the stencil using acrylic paint. We used a stippling sponge tool for this step, but a paintbrush will also do. Repeat this process until you have a full ring going around the stool.

8
Don't worry too much if the stencil pattern doesn't come out perfect, you can refine it using a small paintbrush later on.

Voila!


By the way guys, I’m loving the whole dusty pink and rust colour palette for the bedroom! Have you noticed how much I like to change up the decor in our bedroom? It’s like an addiction for me, but something I find really satisfying. Particularly with a few DIYs sprinkled into the mix!

Pin this DIY on Pinterest!

