


We’re back in the studio with our favourite creatives, this time it’s the incredibly talented Tessa Perlow who’s been busy bringing the traditional art of embroidery into the 21st century with her whimsical blooms and imaginative motifs, expertly applied to upcycled and secondhand clothing.
A woman after my own heart! I first discovered Tessa on Etsy where she sells her creations. I was blown away by the intricate detail she creates on what were once simple, plain old pieces that other people had got rid of from their closets. Talk about vision! Currently living in New Jersey, she also shares her designs on her instagram account, where people can’t snap her designs up quick enough, and is one of a few designers leading a revival of the art of embroidery – something I’ve noticed has been trickling down to brands everywhere. Naturally I had to learn more about her reprocess and what inspires her, I hope you enjoy!

Hi Tessa! Tell us a little bit about you, what you studied and what you’re doing now.
I grew up with a very creative mother, she was always doing crafts with my two sisters and I and she’s also a really skilled quilter. She definitely inspired me to want to learn to sew. In high school I started making my own clothing and experimenting with fabric manipulation and creative sewing, I really wanted to be a fashion designer. I studied fashion design at F.I.T. in New York but have always been interested in all different kinds of crafts and art, I couldn’t really see myself working at a fashion company.
After school, I dabbled in a bunch of different mediums but then really got excited when I started embroidering and beading. Now I’m running my etsy and working part time but my plans for the future are to work on large scale fiber pieces and work with galleries, hopefully have art shows.


How did you start embroidering?
I started experimenting with embroidery after I had completed an internship where I was hand beading garments for runway shows. Until that experience I hadn’t really realized that I was capable of embellishment techniques with my hands. I’ve always loved garments with embroidery and beading and any kind of hand-detailing, so I really just started messing around with old clothes, making things for myself.
After graduating I was briefly babysitting in Brooklyn and would take the train from New Jersey. I started working on samplers & hoops during my commute because they are so transportable and that was a great way for me to practice and make use of my time.


What are some of the inspirations behind your gorgeous and colourful designs?
I’ve always been inspired by fantasy imagery and nature. I think there is a dominant theme of springtime in my work and I love the idea of a magic-garden. I studied fashion design and there was a big focus in school on researched inspiration for our projects. Having that background definitely helps because of all the times I would forcibly get inspired and experiment with different sources of inspiration.
I think I’ve developed my own aesthetic thats part eccentric grandmother, part midsummer nights dream, and part 1960’s folk arts movement. Or something along those lines.. If I’m ever desperate for inspiration or new ideas I go to the library first and look through the art books. Some no-fail inspiration sources for me in Art History are Gustav Klimt, William Morris, Matisse, and Frida Kahlo.


Talk us through the process, how do you create your pieces?
Step 1. Alter
If I am working on a second-hand garment (which I prefer) my first step is to asses if I want to alter it. An easy fix for making a piece feel more modern is cropping it or altering the sleeves.
Step 2. Choose Subject Matter
Once I do that I figure out what direction I want the embroidery to take the garment. Usually the garment will give me ideas – based on its color, texture, and style. I tend to either commit to a very flowery design or go for something kind of flash-tattoo inspired (tigers and snakes etc) but thats not always the case. Sometimes I’ll be thinking of a motif I really want to do and I hold onto it until the right garment comes along.
Step 3. Draw
Once I’m set on the subject matter, I pick an area on the piece and free hand draw what I have in mind. I like to use a variety of inspiration images, so that I can reference the anatomy of say, a flower or an animal, but also look to reference imagery for original color stories. When I draw on the garment I try to keep it as simple as possible so that I don’t damage the garment with ink or make any mistakes.
Step 4. Embroider!
I like to work most of the details in with the threads. I use a sampler hoop to keep the fabric taught when I work, and it usually takes a little bit of rearranging to move the hoop as I fill in the motif with threads. I use cotton embroidery floss that you could find at a craft store (individual DMC embroidery floss or the variety packs) and I like to keep it at 6 strands, which is how it is sold, it keeps the motifs really three dimensional. When I am actually embroidering it seems like a kind of haphazard frenzy.
To make it easy on myself, I like to work color by color- If its a flower I’ll start with the darkest shade and then work into the lighter ones. When I’m done embroidering I really just iron it out! Some people like to back embroidery but I try to avoid adding extra bulk. If you look at vintage garments with folk embroidery they are rarely lined, so I follow that model. If I sew a top myself with the intention of embroidering it, I try to make sure that its lined, because it is nice to have the finished backing.
-
Drawing the designs is done free hand. - Drawing the designs is done free hand.

-
And a hoop is used to steady the fabric. - And a hoop is used to steady the fabric.


Drawing is minimal to avoid damaging the garment.
- Tessa creates colour stories that tie a design together.

-
And often plays on Springtime motifs. - And often plays on Springtime motifs.


Up close, colours are layered in a way that gives the design an almost three dimensional quality.
What advice do you have for other creatives?
My creative advice is to just go for it and don’t stop! Make time for learning a creative hobby, one that you get better and better at as time goes by. There isn’t a lot we get to control in life, but once you learn a technical skill, no one can ever take that away from you! Its an awesome feeling to be able to make something with your own hands & never be afraid to be a beginner.
Its tough to live in the world of social media, because you are exposed to so much, and there is kind of this pressure to be totally fabulous all the time which just isn’t realistic. I think a lot of people don’t try out hand crafts because they’re afraid of being bad at it in the early stages. My early work is definitely cringe-worthy but I love it all the same because it reminds me of how much I’ve improved- and I hope through the years I get better with my technique and that I keep on learning way to make it original and fresh.

How gorgeous is this little deer?


-
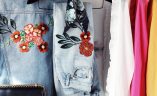
These denim designs are so cool! - These denim designs are so cool!

-
Anyone else need these in their life? - Anyone else need these in their life?

Thanks for joining us Tessa! You can follow her on Instagram or visit her Etsy page to see the new designs she’s added. If you’re looking to learn a little embroidery yourself, we did a (very simple) tutorial that could get you started. See here!
Ps… We’re looking for more inspiring creatives to feature as part of this series, do let me know if you can think of anyone!
Like this post? Pin it for later!


