


If there’s one thing I love to do when the holiday season rolls around is to get crafty. I’ll take a glue gun over reruns of Love Actually any day. Or maybe both at the same time? It used to be all about making a top or deconstructing a dress, but as time goes on my attention moves to more complex projects… ones that involve screws, a screwdriver/drill and lots of potential (for either success or disaster). And while the thought of picking up a drill can be a little daunting, it’s kinda like riding a bike, once you start you can’t stop… Perhaps making it more like a tube of pringles or that Christmas trifle. Either way, it feels pretty good.


DIY Pine Make Up Vanity
You need:
- A round mirror (mine was from Ikea – I took it out of an ugly frame)
- A Bosch IXO cordless screwdriver
- A Bosch drill with a wood boring drill bit
- A piece of pine measuring 2 metres by 1 metre (2.2 yards x 1.2 yards)
- 1 piece of wood measuring 10cm wide and 40cm long (4 in x 10 in)
- 2 pieces of wood measuring 10cm wide and 80 cm long (4 in x 20 in)
- 4 pieces of copper pipe 15 cm long (6 in)
- Liquid nails
- Long screws (optional)

How to
1. You’re going to create a peg board style at the bottom of the piece of pine to insert your copper pipe. To do this mark 3 sets of 3 evenly spaced holes and then drill using the wood boring drill bit.

2. It should look like this.

3. Mark where you want the mirror to sit, making sure it is symmetrical from the sides and top. Then, using the liquid nails, glue the mirror to the board and leave overnight to dry.

4. Place your copper pipe in the holes to create brackets for the shelves.

5. Place your shelves on top and mark where they meet the copper pipe. You’re going to drill them from the back to secure them in place.

6. Secure the shelves onto the vanity by drilling them in place from the back. A cordless drill like this makes it super easy to tackle thick pieces of pine. And whilst it is possible to use the shelves without attaching them with screws, this makes them more secure so your favourite perfume/new bottle of Moroccan Oil doesn’t hit the dust *sob*.

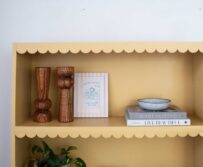
Voila. Add all your prettiest make up supplies and away you go!


On my vanity: Byredo Gypsy Water, bobby pins (when I can find any that is), All Marble Everything jewellery dish, spare bottles for oils and home made fragrances, Purearth cleansers and moisturiser, Liquorice Moon Studio ceramic cup, Shiseido liquid eye liner (a recent find I love!), Bobbi Brown shimmer brick (always), Bobbi Brown concealer, Ray Ban sunglasses.
By the way guys, greetings from Australia! Can’t wait to share more with you about my next month or so down under. xx
This post is in collaboration with Bosch.


